

What is Banking?
Banking is the foundation of Banqer Primary, and it's always on. Each student automatically gets an Everyday account. Their pay, rewards and purchases all go through it.
Students can see their accounts, balance, recent transactions and upcoming automatic payments in Bank Accounts. From there they can pay, transfer money between their accounts, and open a savings account (if you've turned savings on).
Pay or charge students
Go to Students in the sidebar.
To pay one student quickly, use the fast pay amounts on their row (for example $10, $20 or $50).
To choose your own amount, click Pay on the student's row. You can also pay from a student's profile or from the Transactions page.
Choose Credit or Debit, enter an amount, pick a reason, and confirm.
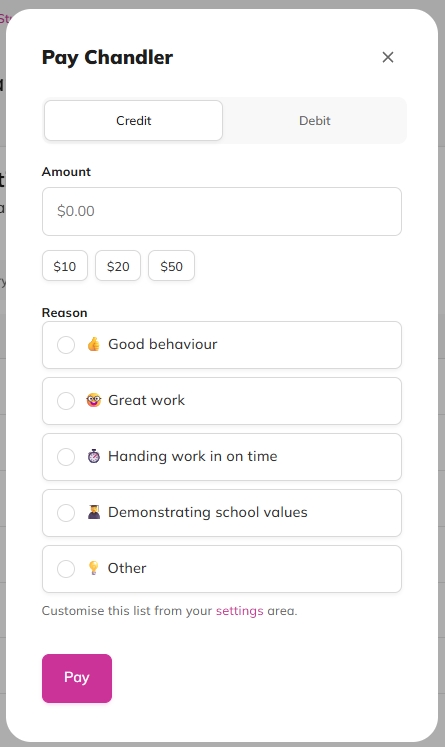
The reasons you pick from are your Credit references (for paying) and Debit references (for charging). You can customise these in your Banking settings.
Choose your Banking settings
Click Topics in the sidebar and open Banking.
Change any of these settings:
Fast payment amounts: the three one-click amounts on each student's row (default $10, $20 and $50).
Allow student-to-student payments: off by default. Turn it on if you want students to pay each other, for example on market days.
Credit references: the reasons you choose from when paying students, like "👍 Good behaviour" or "🤓 Great work". You can have up to 8.
Debit references: the reasons you choose from when charging students, like "🏃 Running late to class". You can have up to 8.
Save your changes.
Turn on Savings Accounts
Click Topics in the sidebar and open Banking.
Find the Savings Accounts section at the top.
Turn it on.
Set the Interest rate (5% by default), and click save.
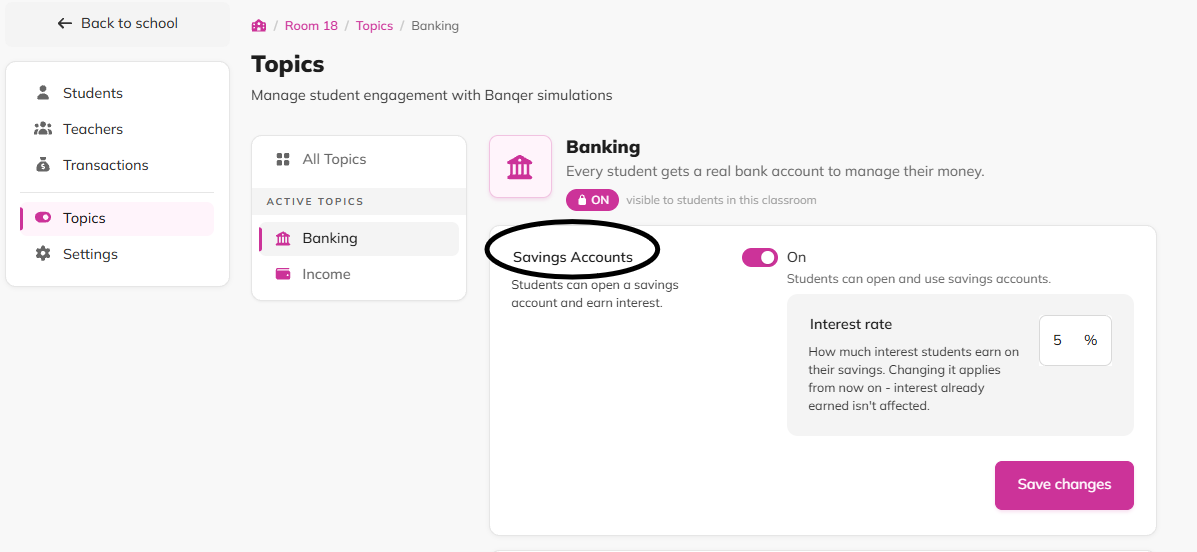
Once savings is on, students can open a savings account from Bank Accounts and move money into it. Interest is paid into savings accounts every week.
Turn off Savings Accounts
Click Topics in the sidebar and open Banking.
Find the Savings Accounts section at the top.
Turn it off.
Flags
Banking can't be turned off. It's always on for every classroom.
Turning savings off freezes existing savings accounts. Students can't move money in or out and no interest is paid, but their balance is kept. Turn savings back on and the accounts unfreeze. Students don't earn interest for the time savings was turned off.
If you change the interest rate, the new rate applies from then on. Interest students have already earned isn't affected.
Tips
Set your credit and debit references to match your class rules or school values, so every payment/charge ties back to something students recognise.
Turn on Savings Accounts once students are comfortable with their Everyday accounts. Then talk about why money grows when you leave it alone.